CT Fly Tyers Who Started on the Farmington Report Thread Control Matters More Than Pattern Selection in Year One. What CTFA Bench Sessions, Housatonic Meadows Staff, and DEEP Trout Stocking Timing Reveal About the Four Patterns Worth Learning Before Opening Day
Fly tyers who attend Connecticut Fly Fishermen's Association bench nights consistently report the same bottleneck in the first season: thread control, not pattern selection, is what separates flies that fish from flies that unravel on the second cast. The consensus from CTFA members and regulars at Housatonic Meadows Fly Shop in Cornwall is that a beginner who ties the same four patterns 20 times apiece will outfish someone who ties 40 different patterns twice each — and will arrive at DEEP's April Farmington stocking window with a box of flies that actually hold up. A functional starter setup runs $80–$150 for vise, thread, bobbin, scissors, and hook assortment. That covers the bench work needed for an entire CT trout season.
What CT Tyers Actually Spend in Year One — and Where Shop Staff Say the Money Should Go
The cost breakdown reported by first-year tyers in CTFA circles typically runs $80–$150 for the core tool kit. Vise: a non-rotary Thompson Model A or Griffin Odyssey Spider ($40–60) handles the first two seasons without limiting what you can tie. Regulars at Housatonic Meadows and UpCountry Sportfishing in Canton report the rotary upgrade — a Renzetti Traveler ($130) or Peak Rotary ($100) — is worth deferring until after a tyer has tied their first 100 flies and knows which motion they actually use.
Bobbin: a Griffin bobbin ($8–12) controls thread tension adequately for all beginner patterns. Scissors: Dr. Slick All-Purpose fine-point scissors ($12) for materials; a second cheap pair for heavier bucktail or wire. Thread: Uni-Thread 6/0 and 3/0 cover the four starter patterns. A hair stacker for elk hair alignment, hackle pliers, and a dubbing needle round out the kit for under $20 combined.
Hooks: Tiemco (TMC) and Gamakatsu are the standard for tying quality. TMC 5263 for woolly buggers, TMC 100 for dry flies, TMC 3761 for nymphs. Buy a 25-pack of each before purchasing any materials — the hook is the foundation everything else fails on.
The Four Patterns Farmington and Housatonic Regulars Tie Before Opening Day
Woolly Bugger — the starting point every experienced CT tyer recommends to beginners. Catches trout, bass, and bluegill across the Farmington, Housatonic, and Salmon River. Uses marabou (tail), chenille (body), and palmered hackle. The sequencing skill — tying materials onto a hook in order — transfers to nearly every pattern that follows. Tie in black and olive, sizes 4–8.
Pheasant Tail Nymph — the go-to subsurface pattern for stocked and holdover Farmington trout. Anglers working the TMA below New Hartford consistently report the PT nymph outproducing bead-head alternatives during DEEP's early-April stocking window. Teaches wrapping technique and segmented body construction. Tie sizes 12–16.
Elk Hair Caddis — the best first dry fly for CT conditions. Farmington hatch-followers report caddis activity through May and June on the upper river; the elk hair caddis in size 14–16 covers it well. Teaches deer and elk hair stacking and wing construction — harder to tie clean than the nymph patterns, but worth tackling around session 10–12.
Clouser Minnow — takes roughly 15 minutes to tie and catches everything from Farmington smallmouth to Long Island Sound stripers. Dumbbell eye placement is the primary new skill; bucktail stacking comes naturally after woolly bugger marabou work. Tie white and chartreuse, sizes 4–2/0 depending on target species.
Suggested sequencing: Woolly Bugger (sessions 1–4), Pheasant Tail Nymph (sessions 5–10), Elk Hair Caddis (sessions 11–18), Clouser Minnow (sessions 19–24).
The Material Foundation That Covers CT Hatches Without Overspending
Begin with materials for the four patterns above only. For the Woolly Bugger: black and olive marabou, medium chenille in black and olive, saddle hackle in black and grizzly. For the Pheasant Tail Nymph: pheasant tail feathers, fine copper wire, peacock herl, and small gold bead heads in 3/32" for Farmington nymph rigs. For the Elk Hair Caddis: a patch of elk hair, dry fly hackle in tan and brown, hare's ear dubbing. For the Clouser Minnow: white and chartreuse bucktail, silver 1/50 oz. dumbbell eyes, pearl Krystal Flash.
Color foundation: black, olive, tan, white, and chartreuse covers the majority of productive CT patterns. Tyers who report expanding color range before completing 100 flies in the base colors consistently describe it as wasted spend — the bench skill develops through repetition, not variety. Thread in black, olive, tan, and rust handles all four patterns.
CT shop sourcing: Housatonic Meadows Fly Shop in Cornwall and UpCountry Sportfishing in Canton carry materials matched to regional hatches. Staff recommendations there reflect what's working on local water, not generic wholesale assortments. Online: J. Stockard and Feather-Craft have reliable bulk pricing once a tyer knows exactly what they need.
CTFA Bench Nights, Farmington-Area Shops, and Tim Flagler: How CT Tyers Report Learning Fastest
The Connecticut Fly Fishermen's Association holds regular bench tying sessions that members describe as the single fastest way to compress a beginner's learning curve — real-time correction from an experienced tyer collapses months of solo confusion into a few evenings. Sessions are open to beginners; contact CTFA directly for the current schedule.
Local Trout Unlimited chapters — including the Farmington River TU chapter — hold tying nights through winter and early spring, timed to the pre-season period before DEEP's April stocking window. Attending one of these sessions in February or March and tying the pheasant tail nymph and elk hair caddis with guidance is the most efficient bench investment available to a CT beginner.
Online: Tim Flagler's Tightline Productions YouTube channel is the standard reference for step-by-step fly tying instruction. Tyers in CT forums report watching each pattern tied at least twice before attempting it at the bench. His Pheasant Tail Nymph, Woolly Bugger, and Elk Hair Caddis videos are the ones consistently recommended in the CTFA community.
Books: Eric Leiser's The Complete Book of Fly Tying and E.H. Rosborough's Tying and Fishing the Fuzzy Nymphs are the two practical references experienced CT tyers most often point beginners toward. Both are technique-focused rather than encyclopedic.
What Experienced CT Bench Tyers Report Beginners Getting Wrong in the First Season
Thread tension is the most commonly cited failure point at CTFA bench sessions. Over-tightening breaks thread and distorts materials; under-tightening causes flies to unravel mid-session or after a single fish. Thread should hold materials securely without cutting into the hook shank — a feel that develops only through repetition.
Material volume is the second consistent report from experienced tyers. A slim woolly bugger in size 6 sinks better and fouls less than a bulky one on the Farmington's stocked sections. Less material is almost always the right call on the first dozen ties of any pattern.
Hook size on first sessions — tyers who begin on size 18 or 20 hooks compound difficulty unnecessarily. Size 10 and 12 for woolly buggers, size 14–16 for pheasant tail nymphs. Scale down after 100 flies at the larger sizes.
Premature material expansion — Farmington regulars report that tyers who stock 30 colors and 15 material types before completing their first 50 flies take measurably longer to develop thread control than those who constrain to three or four patterns in two or three colors.
Finishing shortcuts — a whip finish (two full turns minimum) plus head cement is the standard. Flies finished with half hitches only and no cement unravel quickly. Tim Flagler's whip-finish tutorial is the clearest free demonstration available.
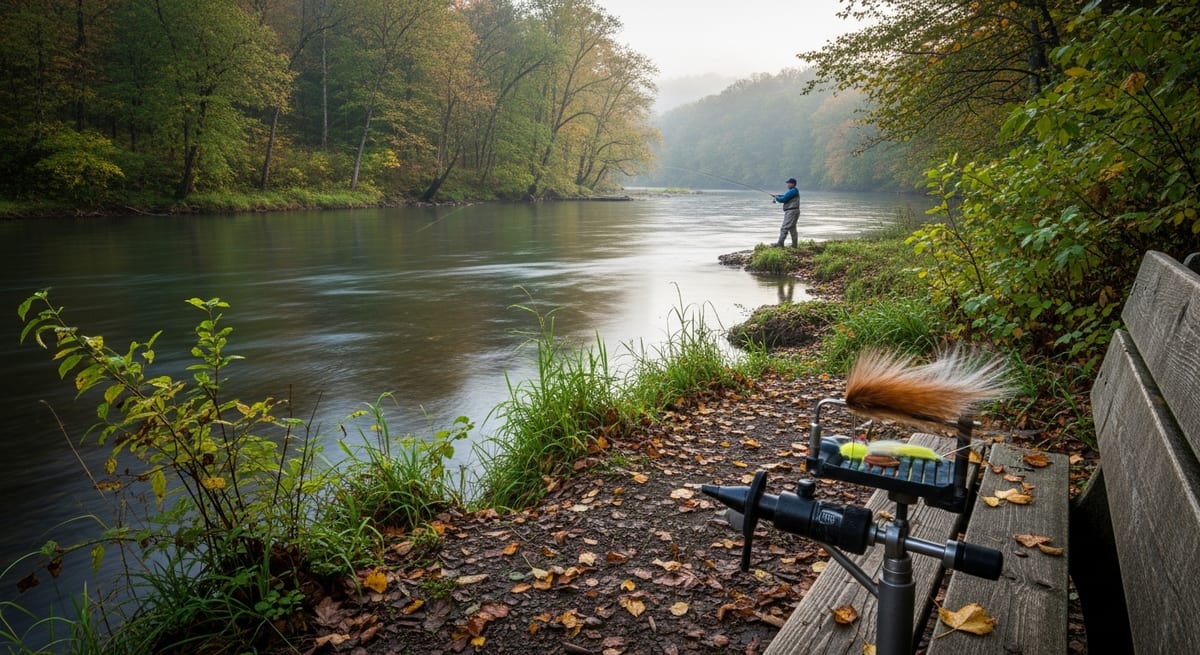
The First Bench Session: A Woolly Bugger Built for the Farmington's April Window
Set up the vise at a well-lit table with a white paper or foam mat below — dropped materials are visible against a light surface. Mount a TMC 5263 size 6 with the hook shank horizontal and point facing down. Attach black 6/0 thread behind the hook eye with 8–10 wraps toward the bend, then trim the tag end.
For a basic black woolly bugger: secure a small clump of black marabou at the bend as a tail (hook-shank length), tie in a 3-inch strip of black medium chenille at the same point, tie in a black or grizzly saddle hackle by the tip. Wrap the chenille forward to 1/8 inch behind the eye, tie off and trim. Palmer the hackle in four to six evenly spaced turns over the chenille, tie off at the eye, trim excess. Build a small thread head, finish with a whip finish, and apply a drop of head cement.
Tyers who start in February or early March — the window CTFA and local TU chapters favor for bench nights — typically have 20–30 fishable woolly buggers and pheasant tail nymphs ready for DEEP's first Farmington and Housatonic stocking runs. As of spring 2026, DEEP's schedule shows the Farmington receiving multiple April and May plants; tyers with consistent subsurface patterns ready before the opener report better sustained catch rates through the first four weeks than those relying on purchased flies that may not match local conditions.
The first tie will not look clean. The tenth will be functional. The twentieth will fish anywhere on CT trout water.
EVERY SATURDAY MORNING
Weekly fishing intelligence
Nationwide conditions, what's biting, and honest gear deals. One email, no noise.
No spam. Unsubscribe anytime.